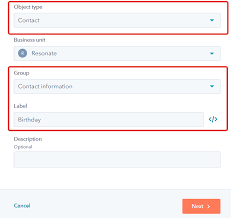
how to add birthday field to hubspot: The default contact birthday property in HubSpot is a text field (not a date), so it can’t be utilized as expected in Workflows and different devices. Nonetheless, you can make a custom date property and use it anyplace inside the framework.
In this article, you will track down a bit by bit guide on the most proficient method to work with a date-driven Birthday property in HubSpot.
The most effective method for how to add birthday field to hubspot

- Open your HubSpot record and snap the settings symbol in the primary route bar.
- In the left sidebar menu, explore to Properties.
- Explore to the Select an item dropdown menu and snap Contact properties.
- Click Create property.
- Fill in Object type, Group, and Label and snap Next.
- You have effectively made a custom Date property.
Read also:
Add a birthday field the default view

how to add birthday field to hubspot: In HubSpot, you can alter fields showed in the left-side menu of items.
You can add the Birthday field to the default view, so you will see it each time you open the record.
- Open your HubSpot record and snap the settings symbol in the principal route bar.
- In the left sidebar menu, explore to Object => Contacts.
- Go to the Record customization tab, click Choose properties for default sidebar and the snap Edit.
- Utilize the inquiry bar to search for the Birthday field.
- If essential, change its situation inside the part and snap Save.
You have effectively added another Birthday property to your contact’s default screen.
Suggested:
petabancana indonesian restworld
Make a Center on date work process

how to add birthday field to hubspot: One of the utilization cases for the Birthday field is sending mechanized messages with good tidings. The rationale is straightforward: HubSpot really looks at the ongoing date, and in the event that it coordinates with a property estimation, the framework plays out any activity (for example Send an email).
- Explore to Workflows and snap Create work process.
- Click Start without any preparation (1)
- select Contact-based
- Click Contact date property
- Select Birthday

- On the Workflow page, set up a Delay of your decision
- It demonstrates when the work process will play out an activity.
- Click an or more symbol to add an activity
- Set up one of the choices
- As we will send a Happy Birthday email, we select Send an email. Select one of the mechanized messages and snap Save.
- Click Review and distribute to audit your work process settings.
- Set up the Re-enlistment measures, so the contact will re-sign up for the work process on various occasions (for example numerous years).
Click Turn on
Presently on every birthday, the contact will get a Happy Birthday email.
Need to benefit from HubSpot? Look at our HubSpot Onboarding and Re-Onboarding administrations